
Home Waterproofing Guide (India): Costs, Methods & How to Stop Leaks for Good
Real 2026 waterproofing costs in India by area and method, why treatments fail, and how to fix leaks once. Terrace, bathroom, walls, basement - all covered.
Waterproofing is the one home job people notice only when it fails. A damp patch on the bedroom wall, a brown stain spreading across the ceiling, paint bubbling off after the first heavy rain — by the time you see these, water has already been travelling through your walls for a while.
This guide is built for two readers: the homeowner staring at a fresh leak during monsoon who needs to act now, and the one planning ahead who wants it done once, properly. It covers what waterproofing actually costs in 2026 across every part of an Indian home, the six main methods and how long each really lasts, why so many treatments fail within two or three years, and how to hire in a way that doesn't leave you paying twice.
The single most important idea here: waterproofing is cheap to do right and brutally expensive to redo. Getting it correct the first time — correct method, correct prep, correct junctions — is worth more than any discount a contractor offers.
1. Quick Answer: What Waterproofing Costs in 2026
Waterproofing in India runs roughly ₹40 to ₹500 per square foot, and that enormous range exists because "waterproofing" covers everything from a basic cement-based coating to a premium sheet membrane engineered to last twenty years.
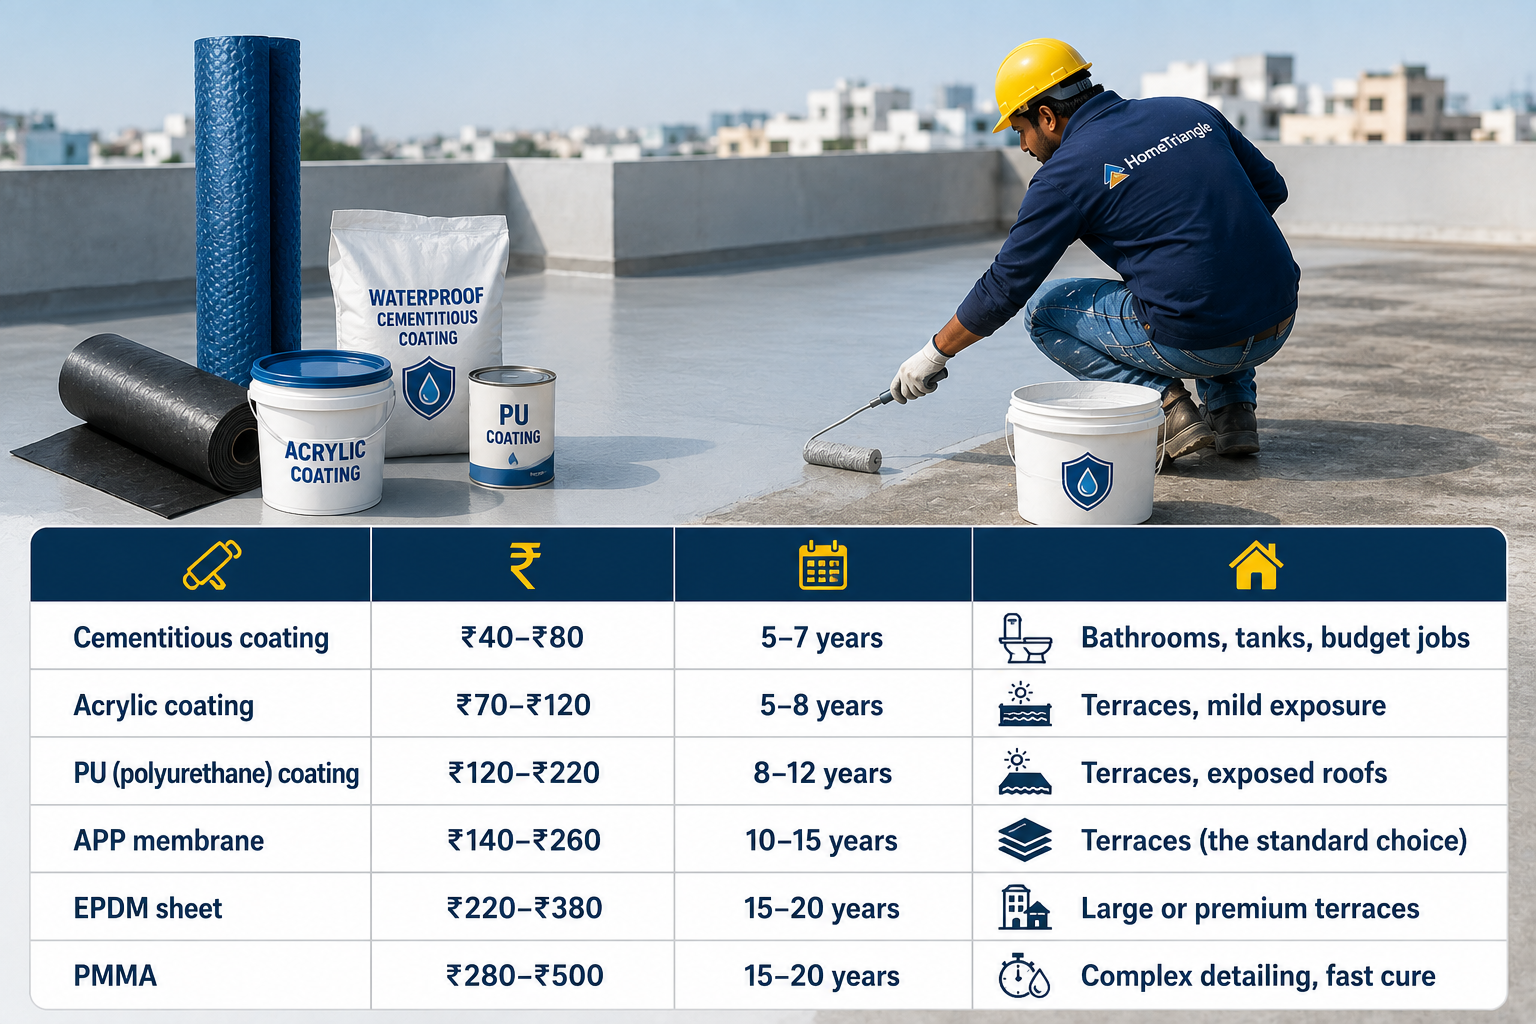
The number that matters for your home depends on which surface and which method. Here's the planning-level picture:
| Method | Cost/sq ft (2026) | Typical life | Best for |
|---|---|---|---|
| Cementitious coating | ₹40–₹80 | 5–7 years | Bathrooms, tanks, budget jobs |
| Acrylic coating | ₹70–₹120 | 5–8 years | Terraces, mild exposure |
| PU (polyurethane) coating | ₹120–₹220 | 8–12 years | Terraces, exposed roofs |
| APP membrane | ₹140–₹260 | 10–15 years | Terraces (the standard choice) |
| EPDM sheet | ₹220–₹380 | 15–20 years | Large or premium terraces |
| PMMA | ₹280–₹500 | 15–20 years | Complex detailing, fast cure |
Whole-job examples: a leaking 800 sq ft terrace can run from about ₹50,000 with a basic cementitious system up to ₹3 lakh with an APP membrane on an already-failing surface. A standard bathroom is far cheaper — often ₹3,000–₹6,000 for the chemical layer plus membrane in the shower zone.
Treat these as planning ranges. The honest truth every good contractor will tell you: an accurate price only comes after someone stands on your terrace or in your bathroom and diagnoses the actual problem.
2. Cost by Area of the Home
| Area | Typical 2026 range | Notes |
|---|---|---|
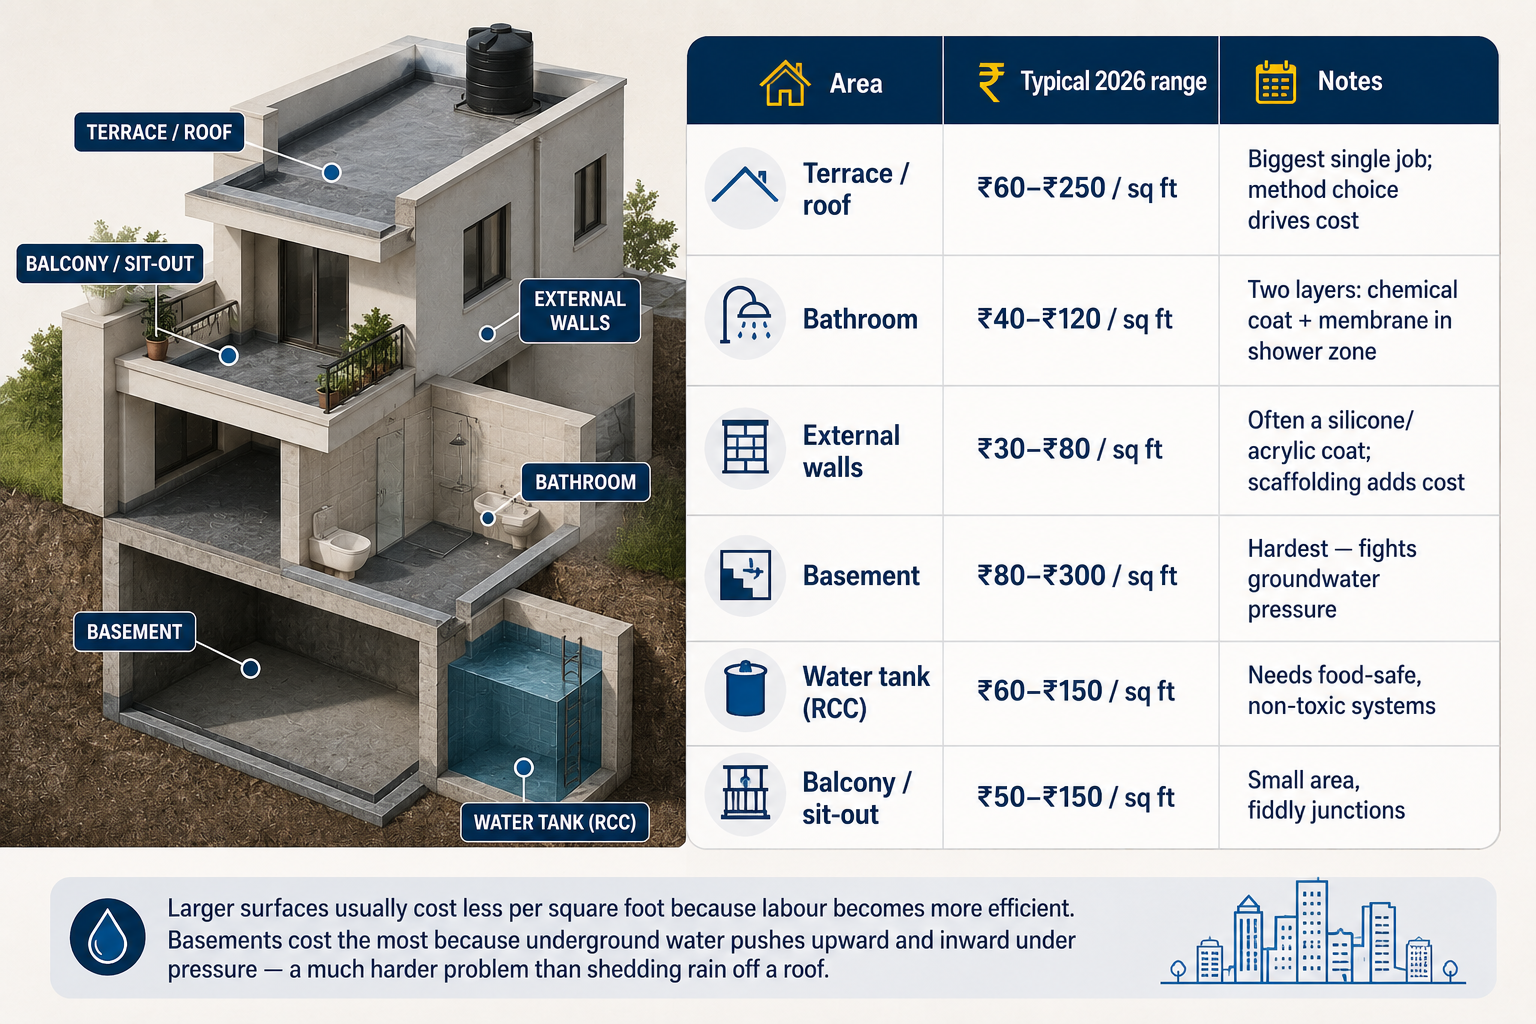
| Terrace / roof | ₹60–₹250 / sq ft | Biggest single job; method choice drives cost |
| Bathroom | ₹40–₹120 / sq ft | Two layers: chemical coat + membrane in shower zone |
| External walls | ₹30–₹80 / sq ft | Often a silicone/acrylic coat; scaffolding adds cost |
| Basement | ₹80–₹300 / sq ft | Hardest — fights groundwater pressure |
| Water tank (RCC) | ₹60–₹150 / sq ft | Needs food-safe, non-toxic systems |
| Balcony / sit-out | ₹50–₹150 / sq ft | Small area, fiddly junctions |
Larger surfaces usually cost less per square foot because labour becomes more efficient. Basements cost the most because underground water pushes upward and inward under pressure — a much harder problem than shedding rain off a roof.
3. The Six Waterproofing Methods Compared
Understanding the methods is what lets you tell a fair quote from a bad one.
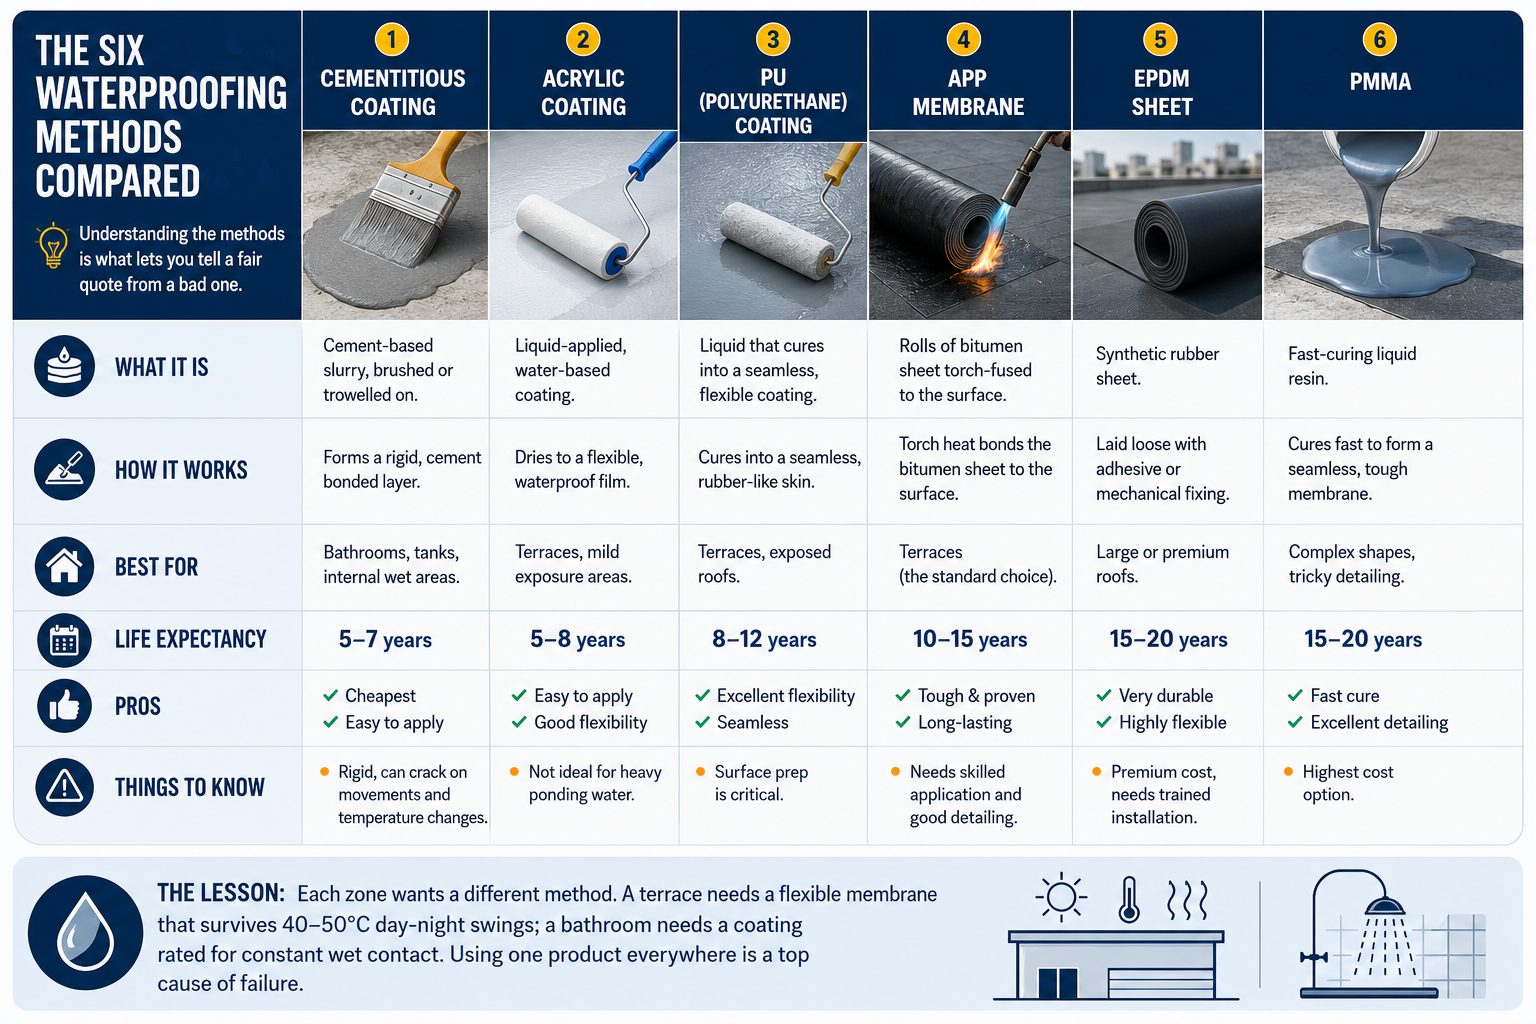
Cementitious coating. Cement-based slurry, brushed or trowelled on. Cheapest, easy to apply, rigid. Good for bathrooms and tanks; less ideal on surfaces that flex in heat, because it can crack. 5–7 years.
Acrylic coating. Liquid-applied, more flexible than cementitious, water-based. A common terrace choice (Dr. Fixit Roofseal type products). 5–8 years.
PU (polyurethane) coating. Liquid that cures into a seamless, flexible rubber-like skin. Handles the thermal expansion an exposed Indian terrace goes through. 8–12 years.
APP membrane. Rolls of bitumen sheet torch-fused to the surface. The workhorse standard for terraces — tough, proven, long-lasting. 10–15 years. Needs skilled application.
EPDM sheet. Synthetic rubber sheet, very durable and flexible. Premium, used on larger or high-value roofs. 15–20 years.
PMMA. Fast-curing liquid resin, excellent for complex shapes and tricky detailing. Highest cost. 15–20 years.
The lesson: each zone wants a different method. A terrace needs a flexible membrane that survives 40–50°C day-night swings; a bathroom needs a coating rated for constant wet contact. Using one product everywhere is a top cause of failure.
4. What Actually Drives the Price
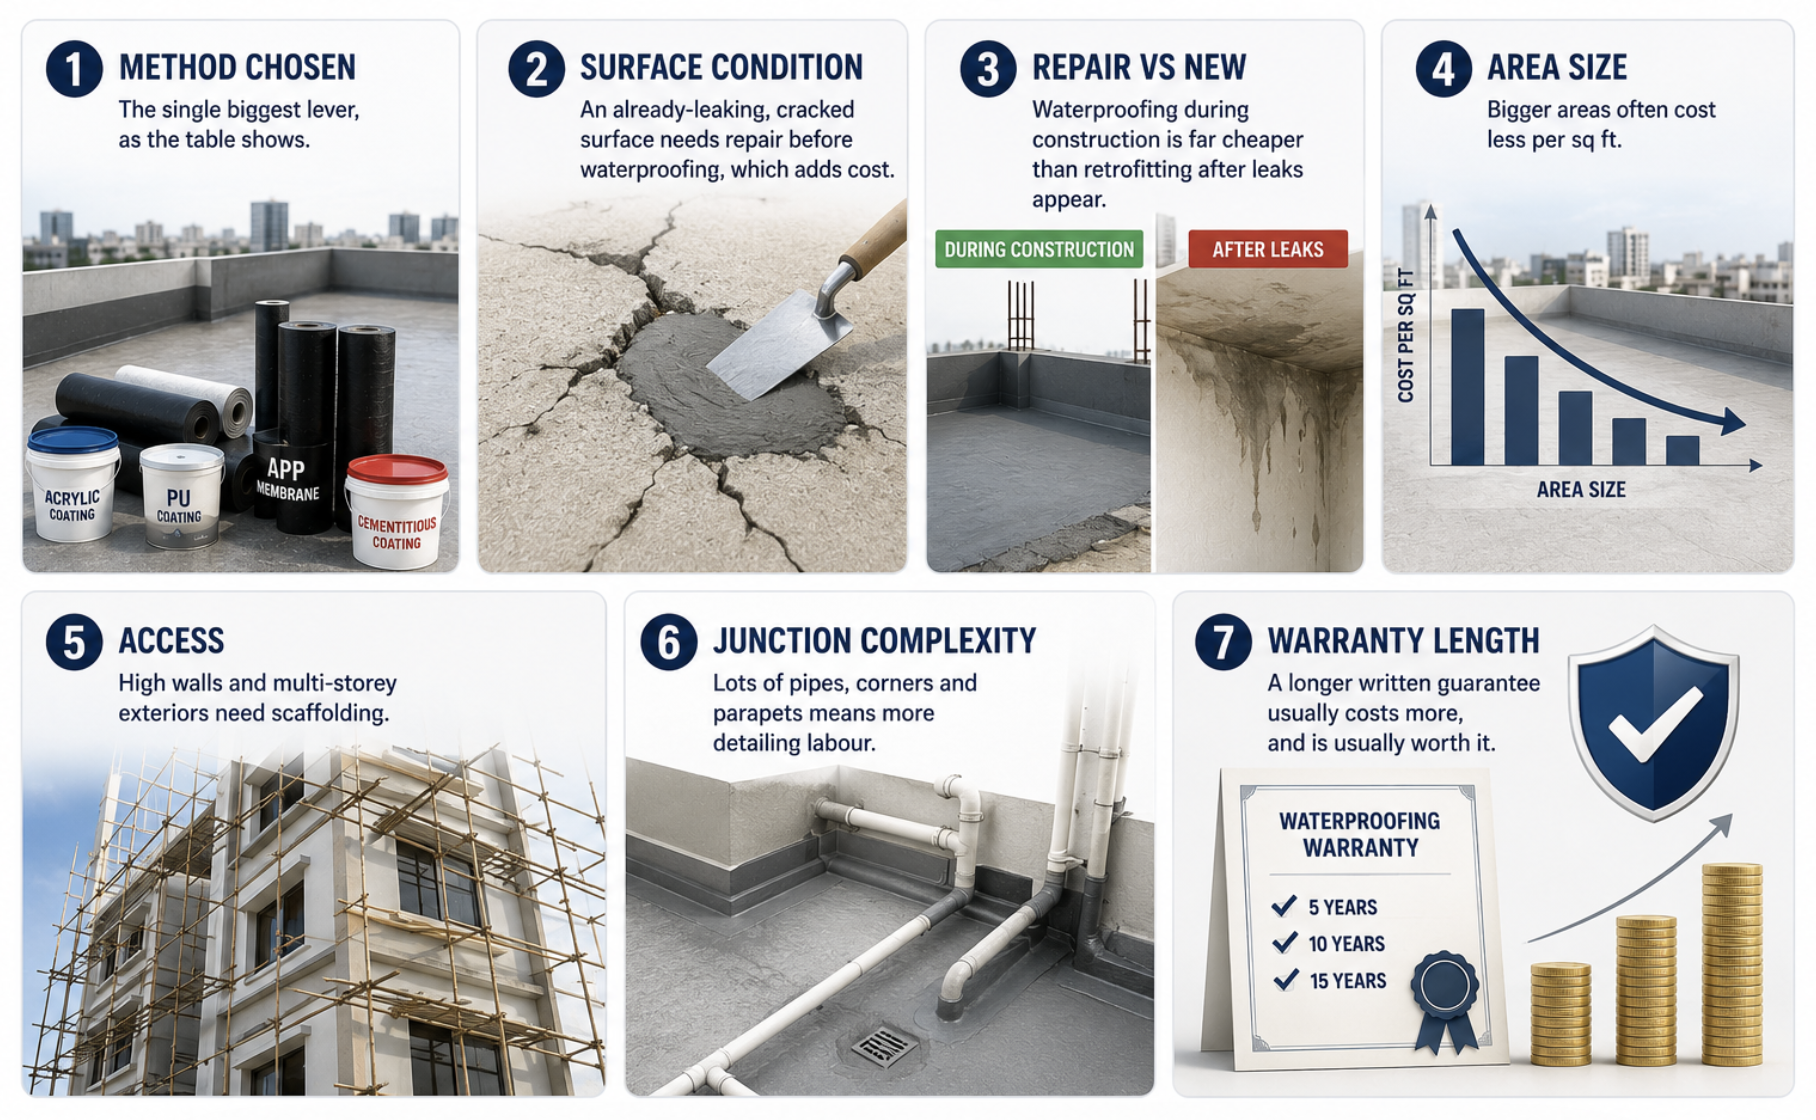
- Method chosen — the single biggest lever, as the table shows.
- Surface condition — an already-leaking, cracked surface needs repair before waterproofing, which adds cost.
- Repair vs new — waterproofing during construction is far cheaper than retrofitting after leaks appear.
- Area size — bigger areas often cost less per sq ft.
- Access — high walls and multi-storey exteriors need scaffolding.
- Junction complexity — lots of pipes, corners and parapets means more detailing labour.
- Warranty length — a longer written guarantee usually costs more, and is usually worth it.
5. Signs Your Home Needs Waterproofing Now
Water shows itself long before it drips. Watch for:
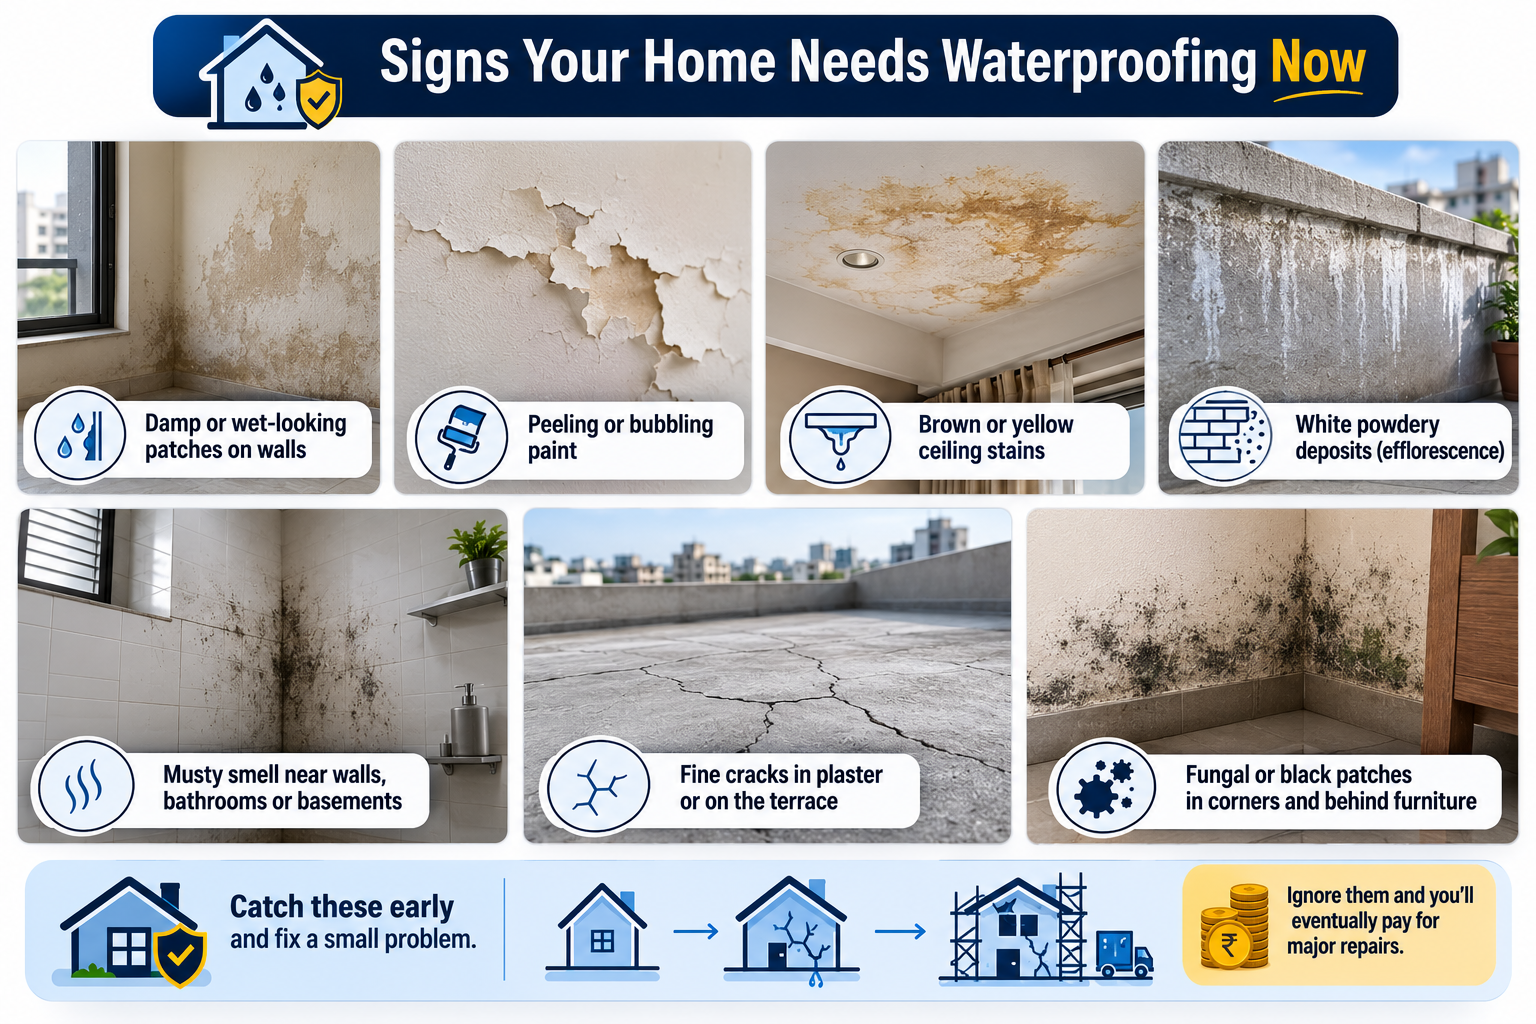
- Damp or wet-looking patches on walls, even in dry weather.
- Peeling or bubbling paint — paint doesn't lift on its own; moisture is pushing from behind.
- Brown or yellow ceiling stains, especially on the top floor after rain.
- White powdery deposits (efflorescence) — salt left behind as water evaporates through the wall.
- A musty smell near walls, bathrooms or basements — often hidden mould.
- Fine cracks in plaster or on the terrace — entry points that widen over time.
- Fungal or black patches in corners and behind furniture.
Catch these early and you fix a small problem. Ignore them and you eventually pay to break tiles, redo plaster, and sometimes move out during repairs.
6. Why Waterproofing Fails — and How to Avoid It
This is where most articles go quiet and where you lose the most money. Failures rarely come from bad products; they come from bad execution. The recurring causes:
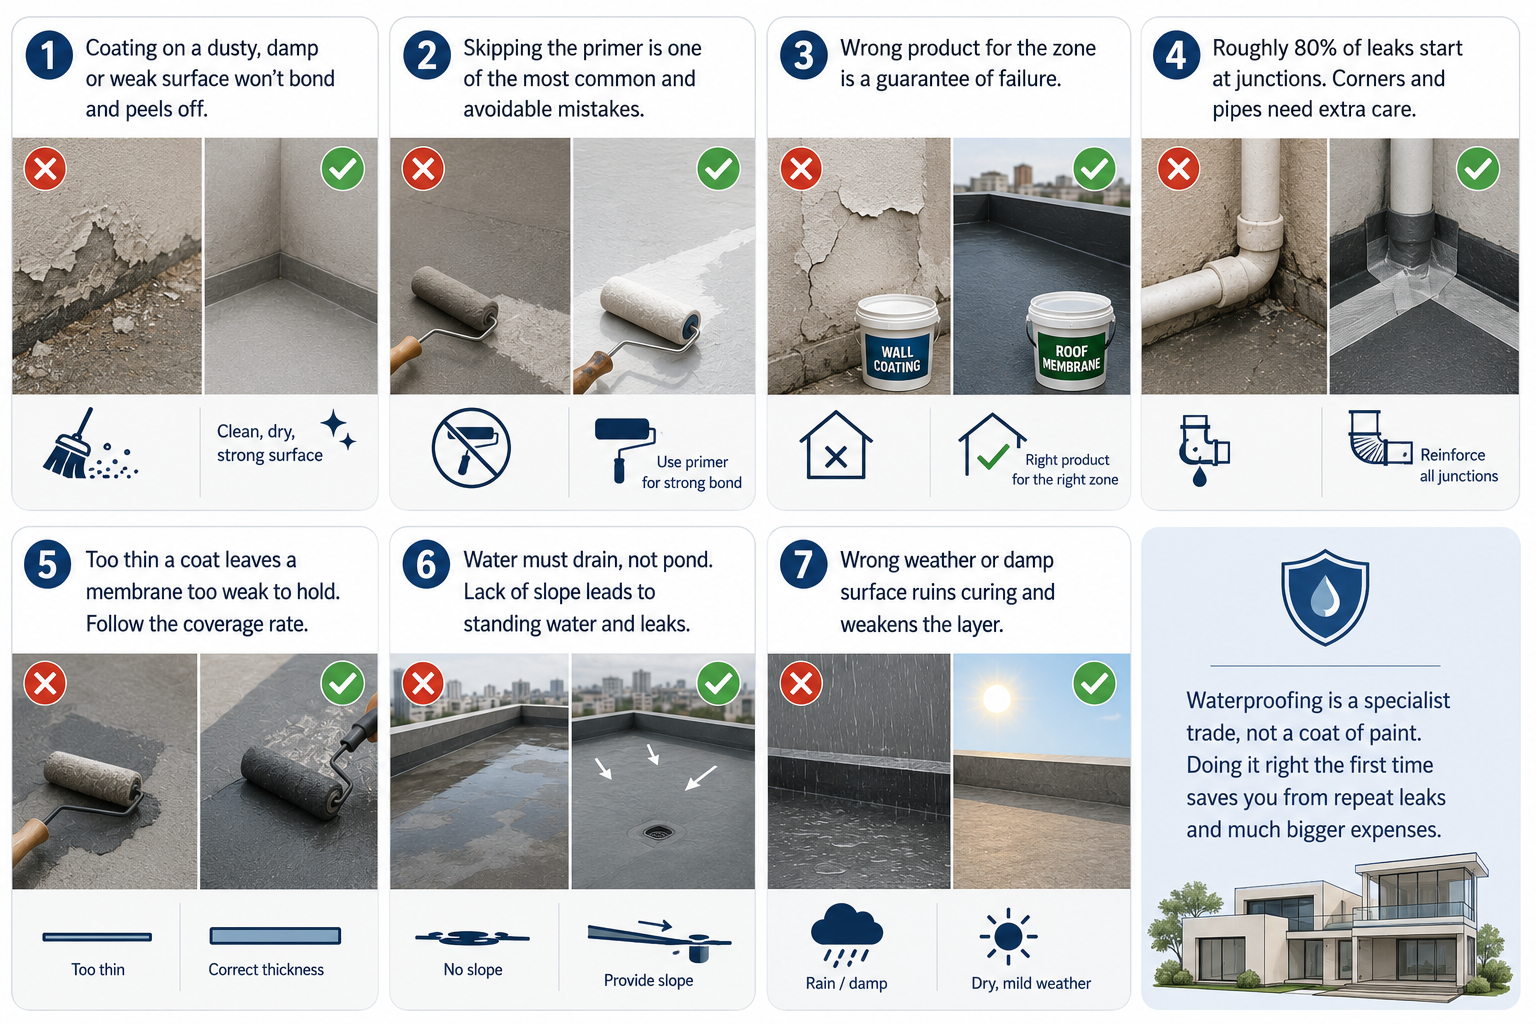
Poor surface preparation. A coating applied over dust, oil, damp or a weak surface won't bond, and peels off under water pressure. This is the number-one cause across every application.
Skipping the primer. The primer is what makes the waterproofing layer grip the surface. Skipping it to save time or money is one of the most common and most avoidable mistakes.
Wrong product for the zone. A wall product used on a roof, or a general coating used in a shower, is a guarantee of failure. Each surface faces different water pressure.
Untreated junctions. Roughly 80% of leaks start at junctions — wall-to-floor, roof-to-parapet, and around pipes. These need reinforcing tape or fabric embedded in the coating. A contractor who coats the flat areas but rushes the corners is setting up the next leak.
Too thin a coat. Applying below the specified coverage rate leaves a membrane too weak to hold. Missing coats have the same effect.
No slope on the terrace. Water must drain, not pond. Standing water degrades any coating over time. A minimum slope toward the outlets is essential.
Applying in the wrong conditions. Waterproofing over damp, or in rain or harsh sun, ruins curing.
The through-line: waterproofing is a specialist trade, not a coat of paint. Treating it like painting — slap it on, done — is exactly why so many jobs leak again within two or three years.
7. Terrace and Roof
The highest-priority area in most Indian homes and the first line of defence against monsoon. A flat terrace also endures brutal thermal cycling — surface temperatures can swing 40–50°C between afternoon and night — which stresses any material on it. That's why flexible systems (PU, APP membrane) outperform rigid ones here.
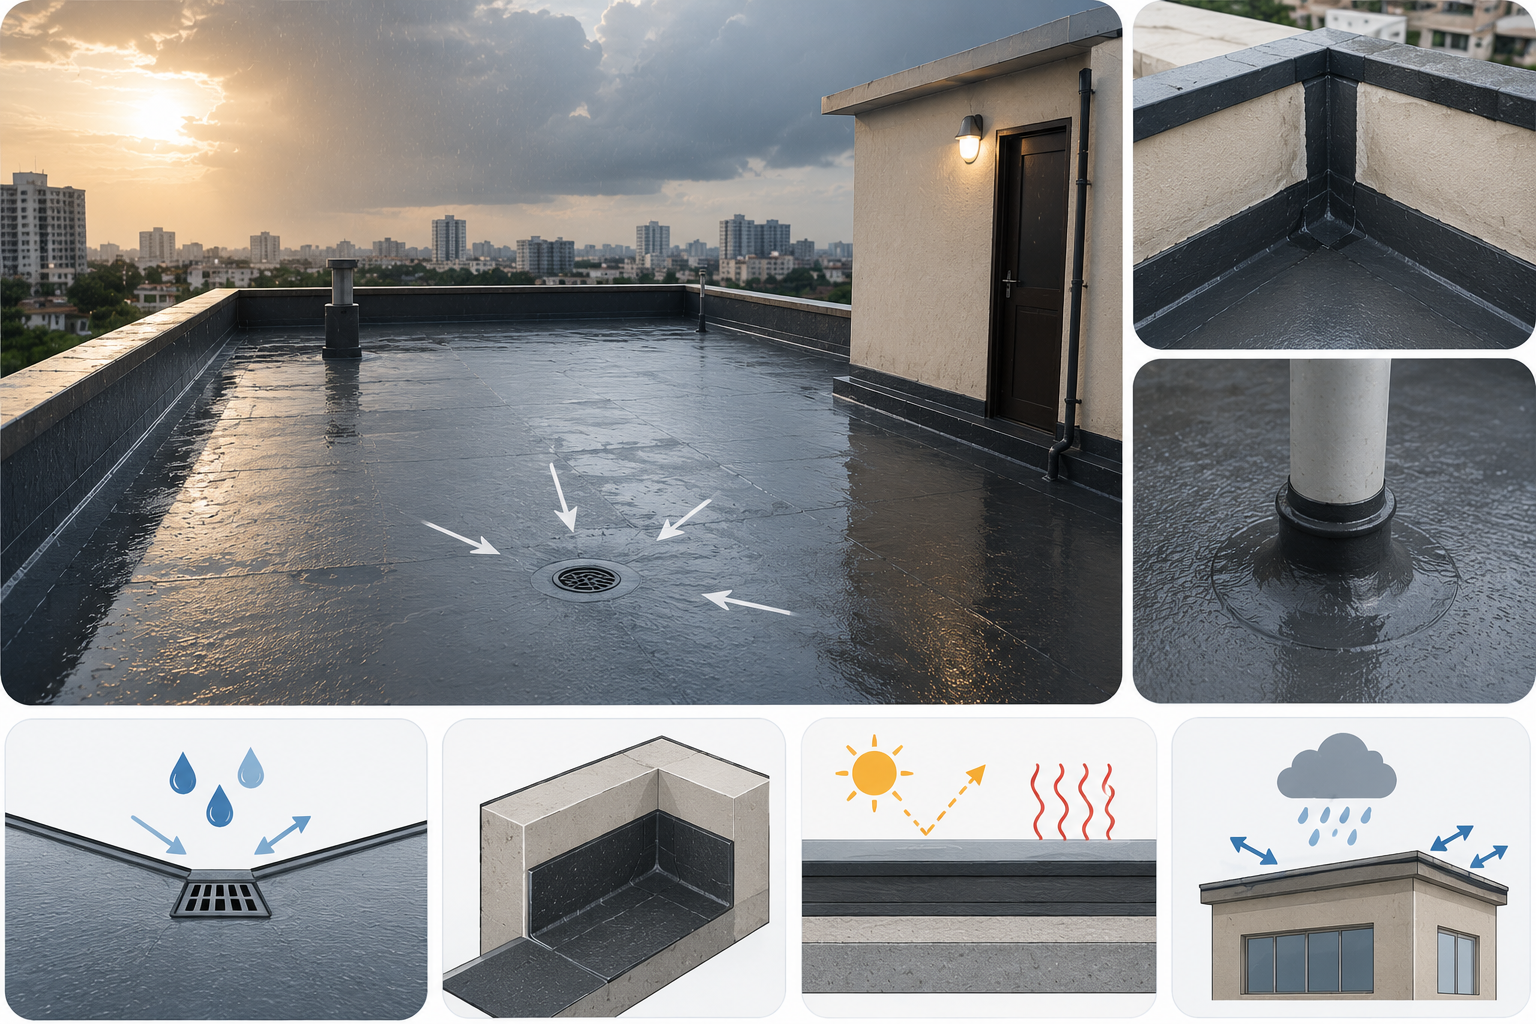
Non-negotiables for a terrace job: proper slope toward drains, treated parapet junctions, and a method rated for UV and heat. Skimp on any of these and the monsoon finds the gap.
8. Bathrooms and Wet Areas
Bathrooms fail differently — they face constant moisture from the inside. The correct approach is layered: a cementitious or acrylic chemical coat on the slab and up the walls (typically to about four feet), plus a membrane in the shower zone.
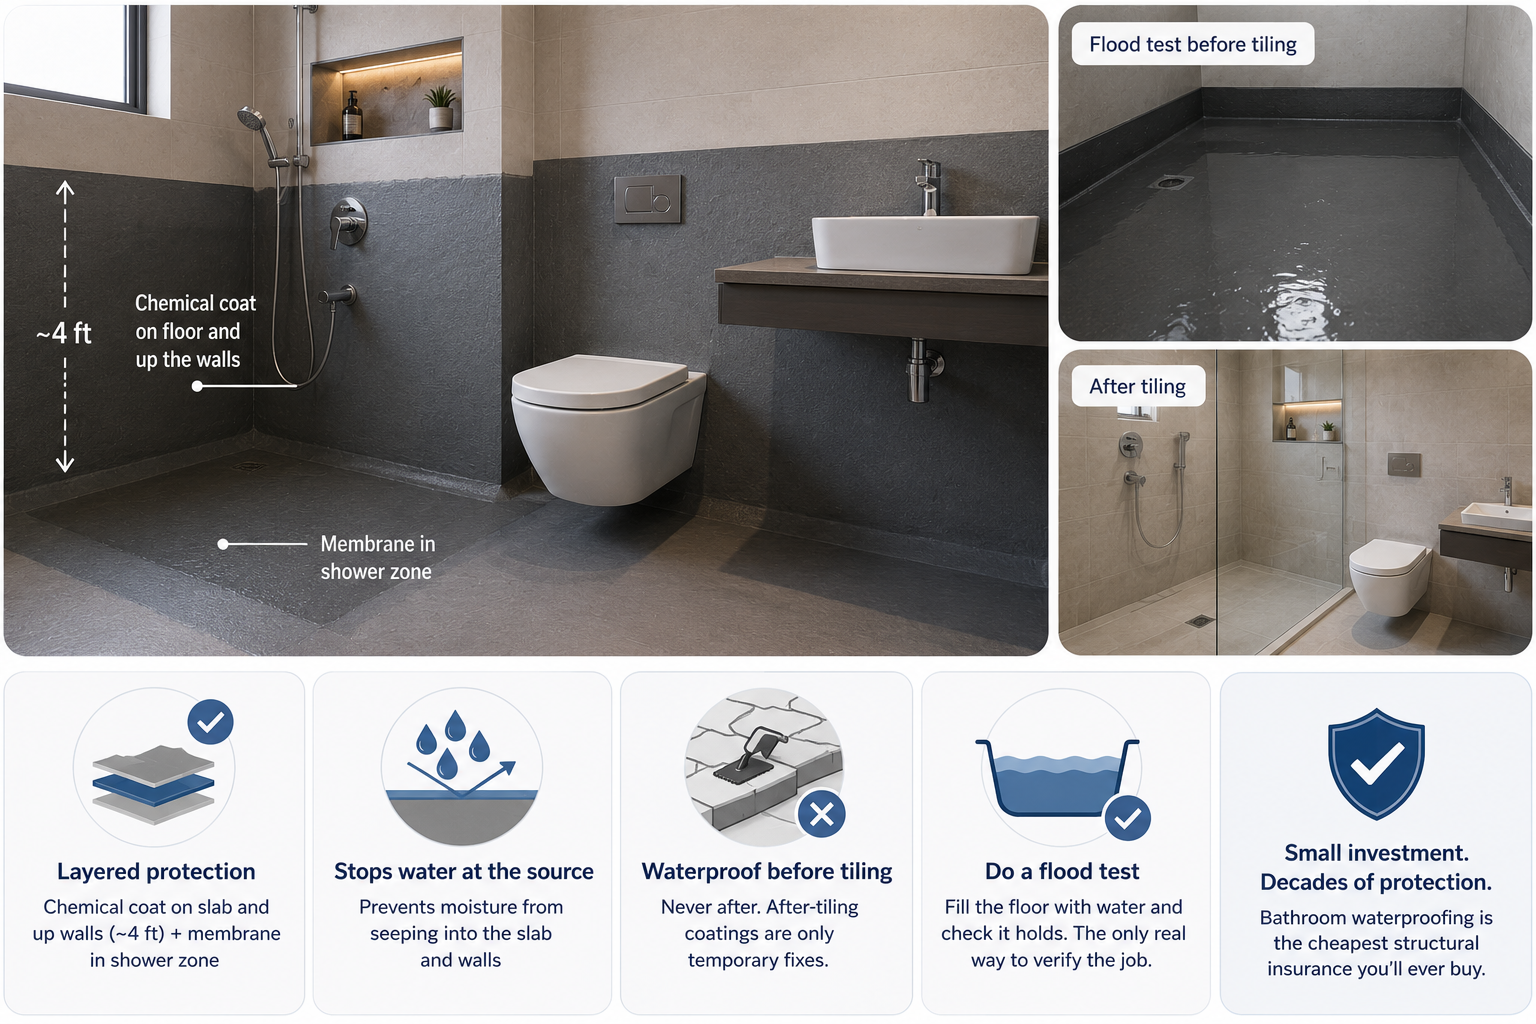
Two rules decide whether a bathroom stays dry for a decade:
- Waterproof before tiling, never after. Coating over finished tiles is a band-aid, not a fix.
- Do a flood test before tiling — fill the waterproofed floor with water and check it holds. It's the only real way to verify the job.
For the cost of a decent dinner out, bathroom waterproofing is the cheapest structural insurance you'll ever buy.
9. External Walls and Seepage
Rain-driven moisture enters through porous exterior plaster and shows up as damp on the inside wall. External wall treatment — often a silicone or acrylic water-repellent coating — stops it at the source. This is usually cheaper per sq ft than terrace work, but scaffolding on a tall or multi-storey building adds to the bill.
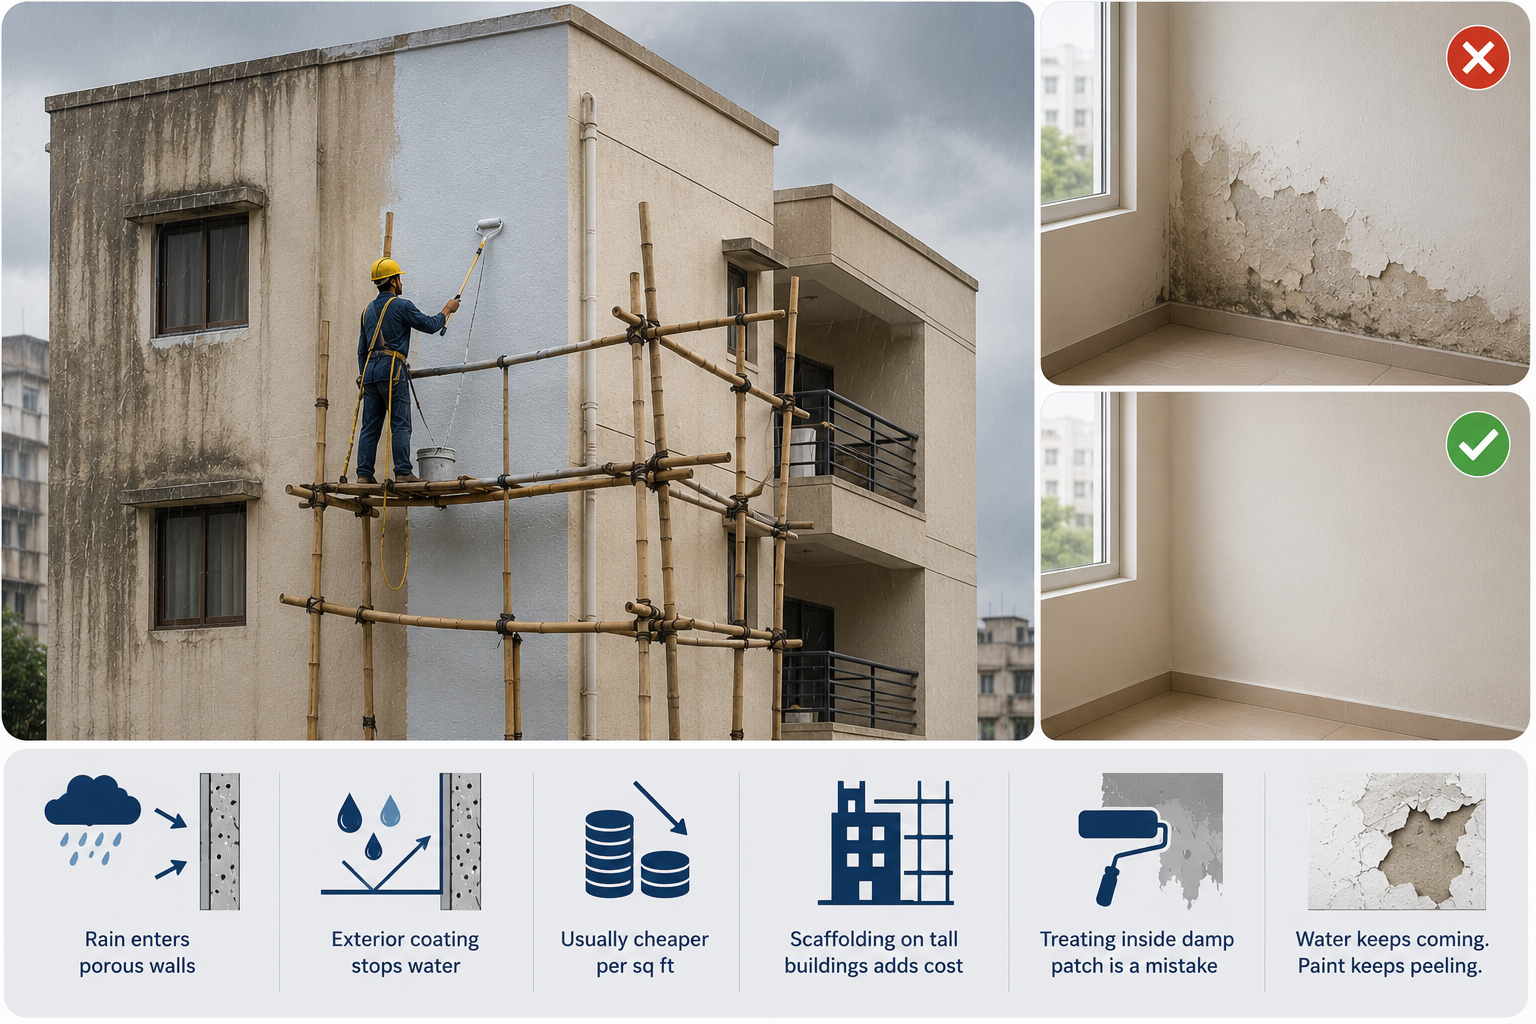
A common mistake is treating the inside damp patch with interior paint while ignoring the outside cause. The water keeps coming; the paint keeps peeling.
10. Basement and Foundation
The hardest zone. Groundwater pushes upward and inward under hydrostatic pressure, so basement waterproofing has to resist water actively trying to get in, not just shed it. This needs specialist systems and often crystalline or pressure-grouting approaches. It's the most expensive per sq ft for good reason — get a specialist, not a generalist.
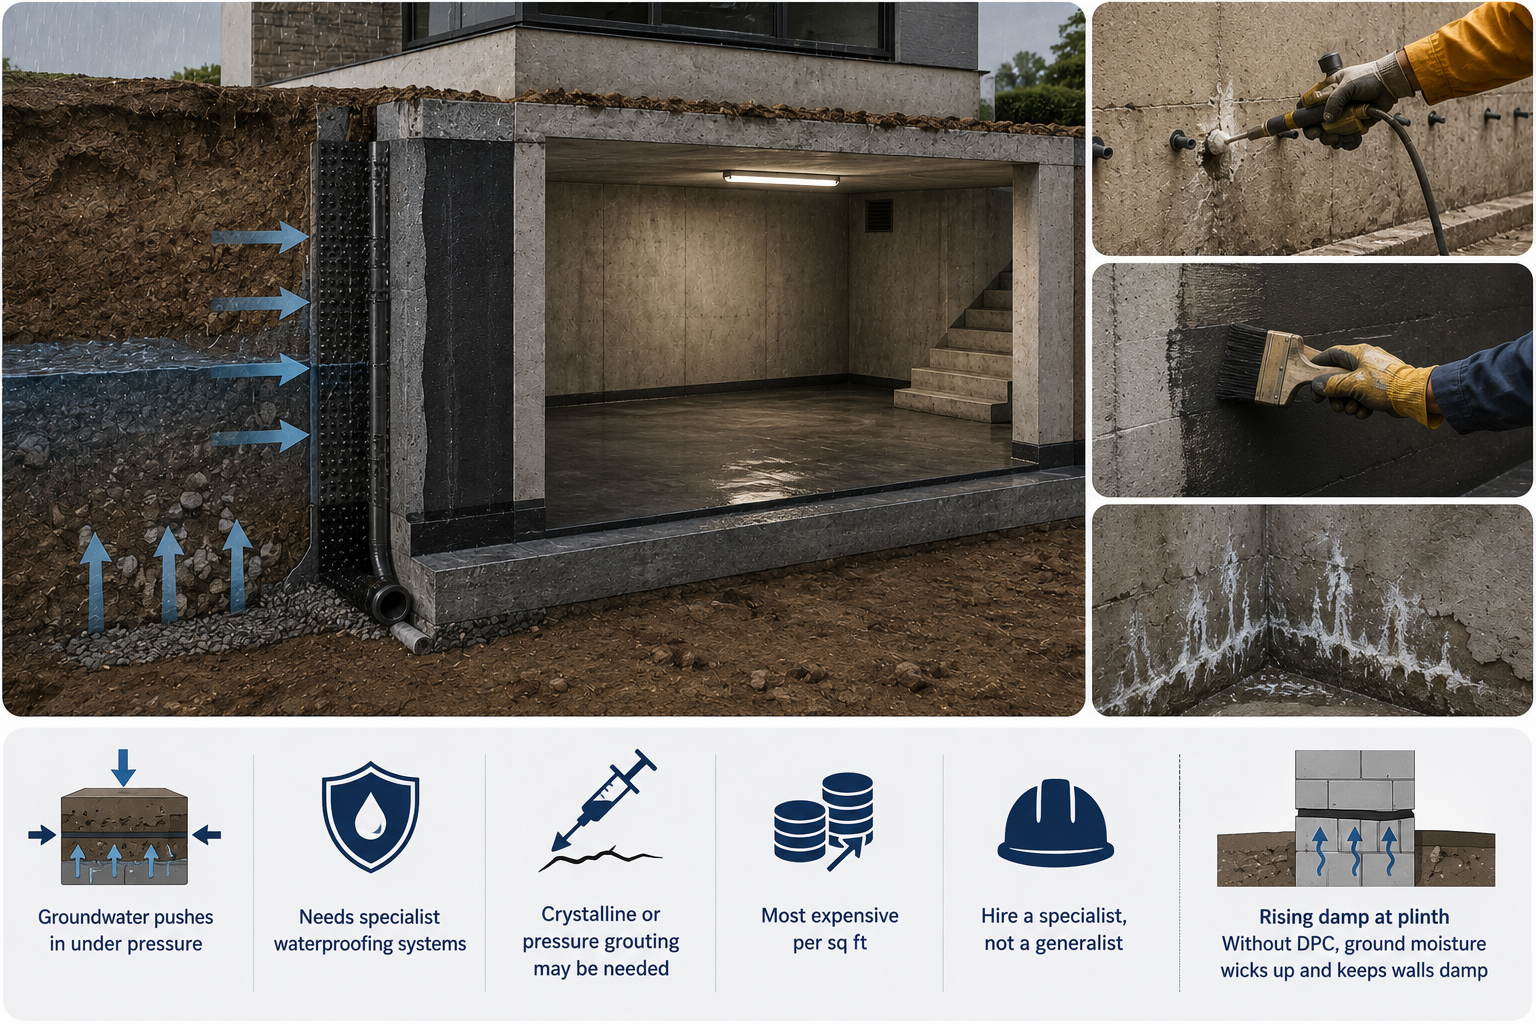
Rising damp at the plinth is a related issue: without a proper damp-proof course (DPC), ground moisture wicks up and keeps ground-floor walls permanently damp.
11. Water Tanks
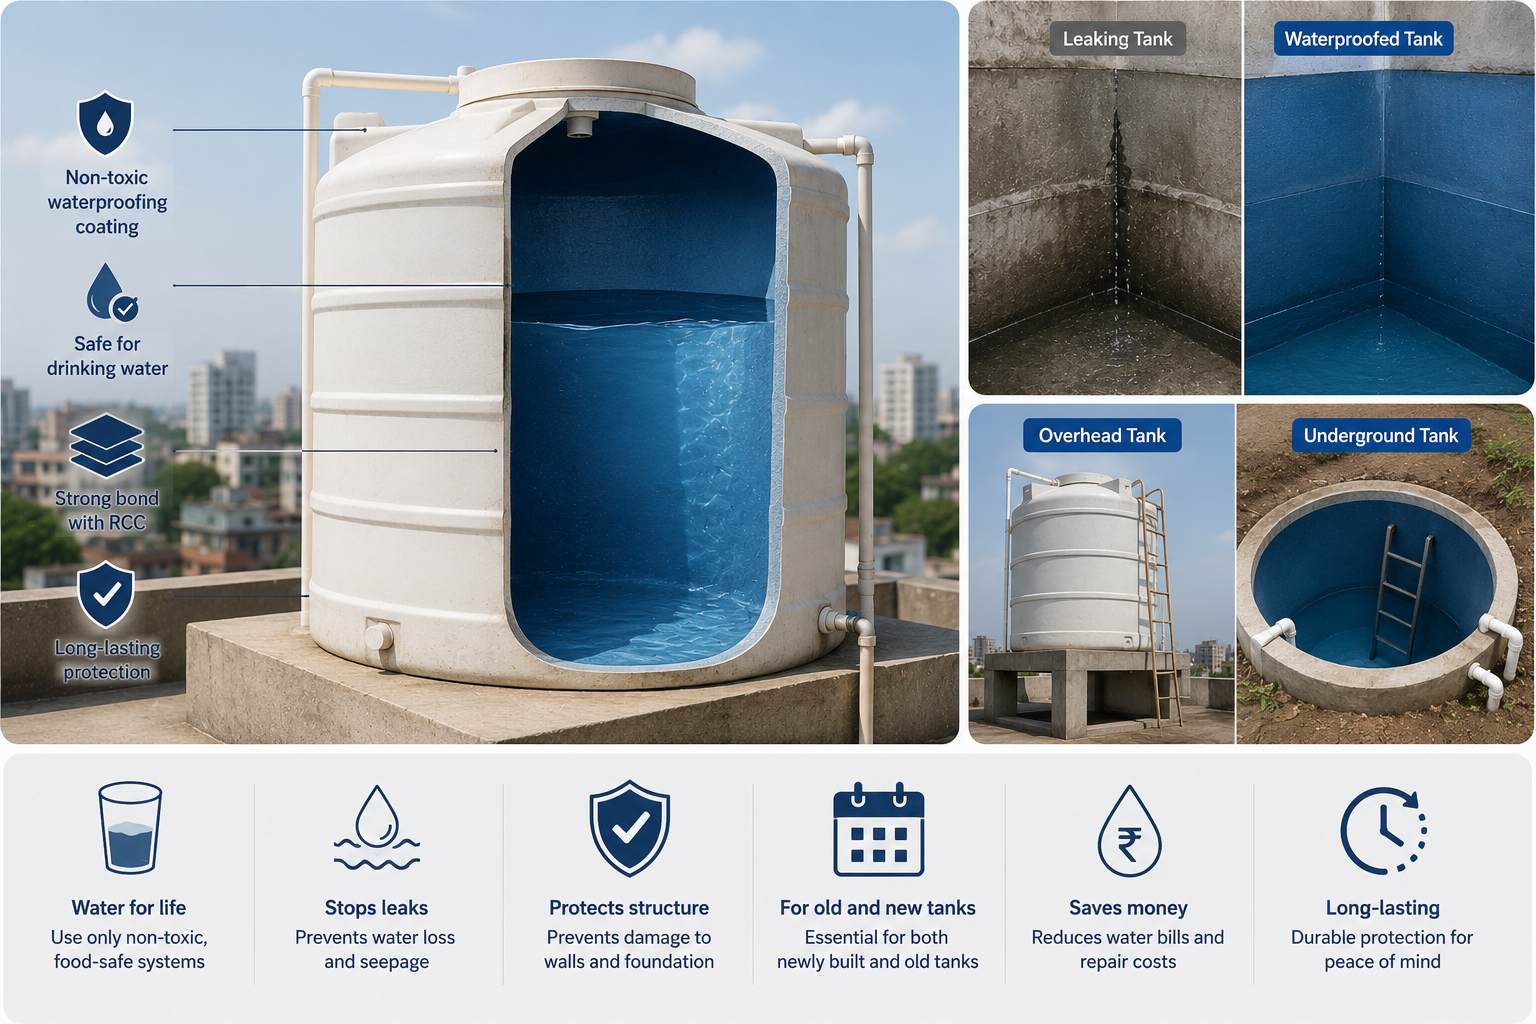
Overhead and underground RCC tanks are a frequent, overlooked leak source. Tank waterproofing must use non-toxic, food-safe systems because the water is for drinking. Both old and newly built tanks benefit — a leaking tank wastes water and quietly damages the structure around it.
12. Waterproofing vs Just Painting Over Damp
This deserves its own section because it's the most expensive shortcut homeowners take. Paint is not waterproofing. Painting over a damp wall traps the moisture, and within months the paint bubbles and peels while the wall keeps deteriorating underneath.
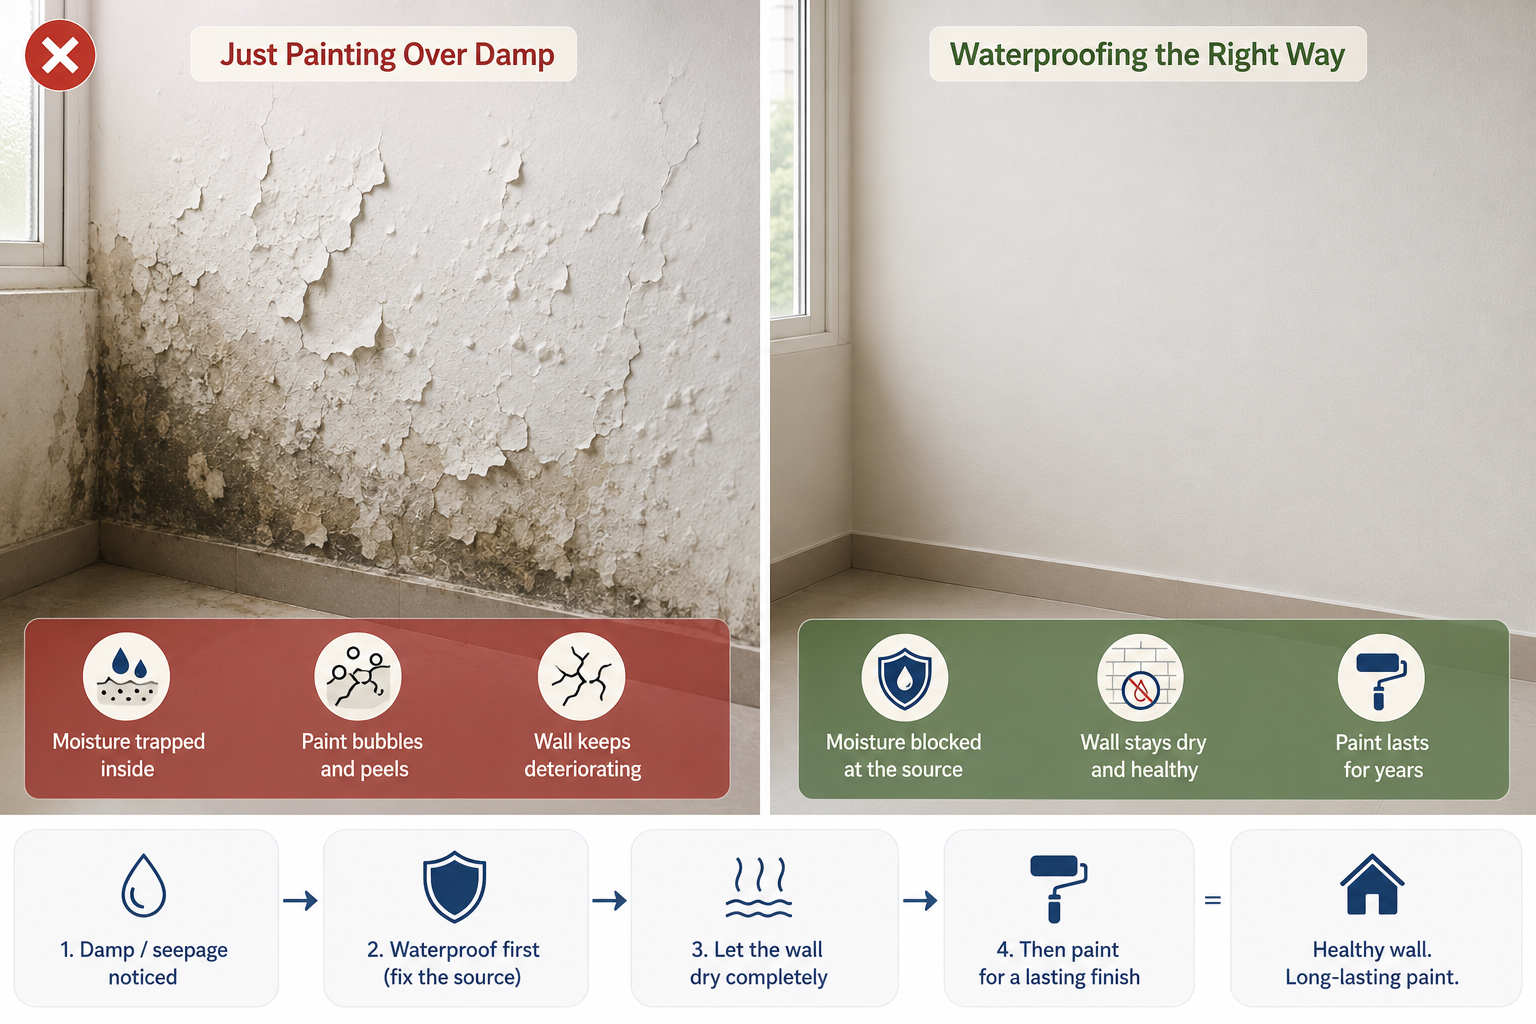
If you're planning to repaint and a wall shows any damp, seepage or staining, waterproof first — fix the source, let it dry, then paint. Our house painting guide makes the same point from the other side: monsoon damp is a top reason fresh paint jobs fail within a year.
13. Monsoon Urgency and Timing
The best time to waterproof is before the monsoon — the dry pre-monsoon months. Surfaces need to be dry to prep and cure properly, and you want protection in place before the rain tests it.
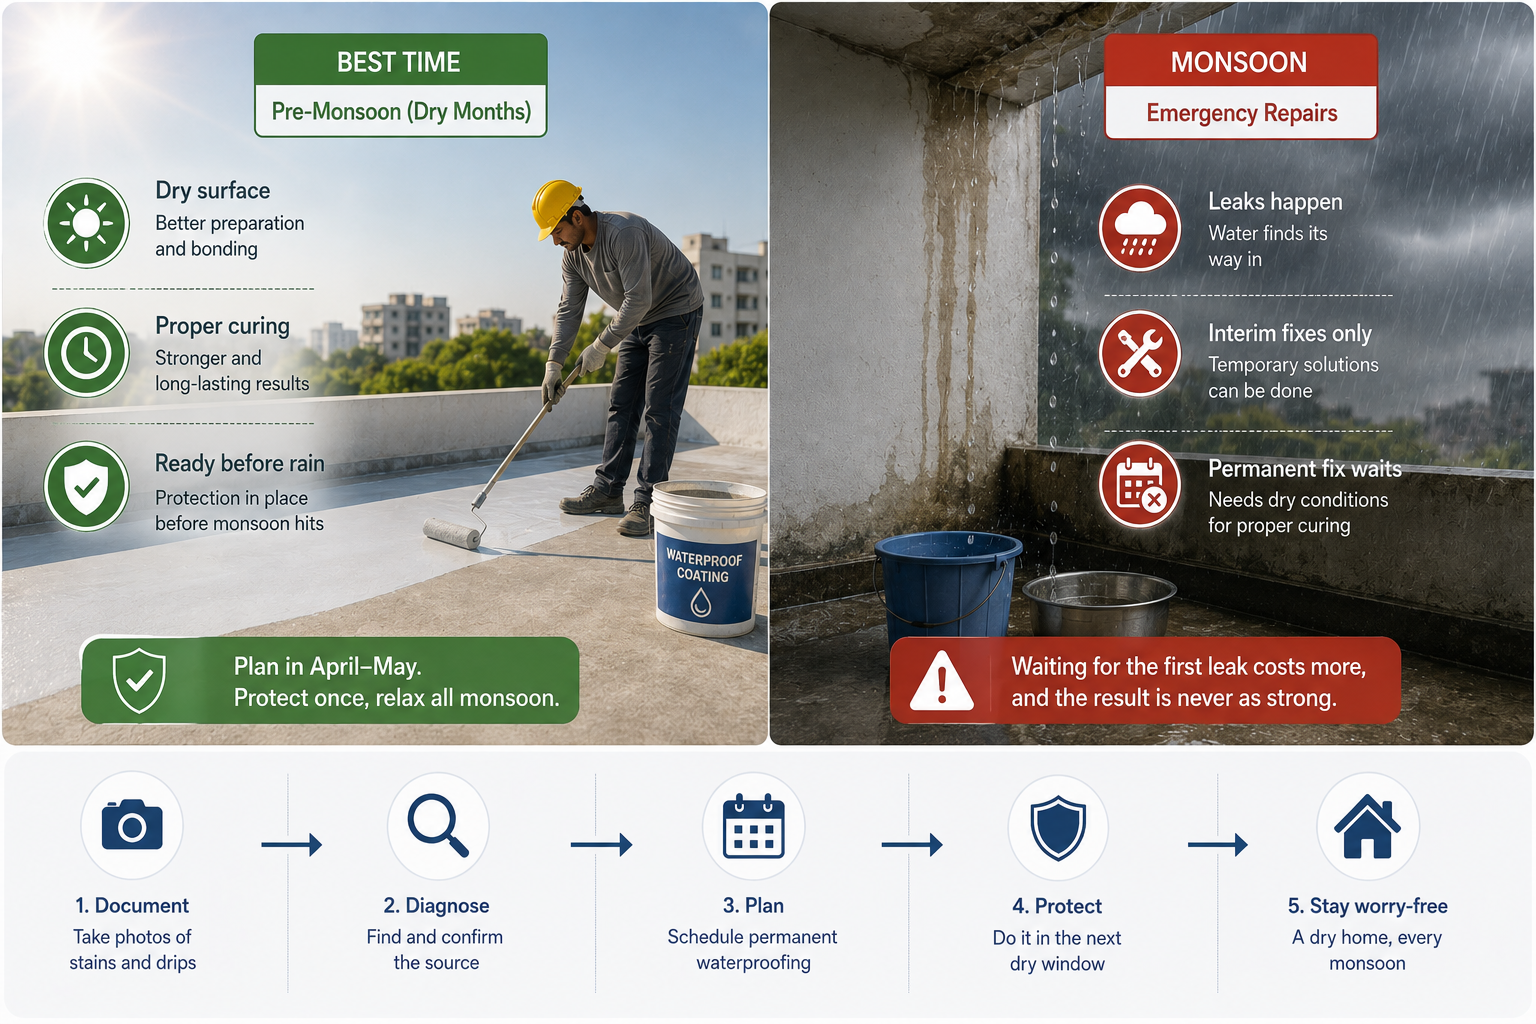
If a leak appears during monsoon, you're in emergency-repair territory. Good contractors can do interim work, but a permanent fix usually waits for a dry spell because you can't properly waterproof a wet, actively-leaking surface. This is why homeowners who wait for the first leak end up paying more and getting a weaker result than those who acted in April–May.
If you're reading this mid-monsoon with an active leak: document it (photos of stains and drips), get the source diagnosed now, and schedule the permanent treatment for the next dry window.
14. How to Hire and Verify a Contractor
Waterproofing attracts corner-cutters because the work hides underground or under tiles, and failure only shows up seasons later. Protect yourself:
- Insist on a site inspection and diagnosis before any quote. A price given over the phone without seeing the surface is a red flag.
- Get the method named in writing — exact product, number of coats, coverage rate, and how junctions will be treated.
- Ask specifically about junctions and slope — if they can't explain how they'll handle corners and drainage, keep looking.
- Get a written warranty (see next section).
- Don't default to the cheapest quote — the lowest bid usually means cheap material, untrained applicators, and no accountability. Waterproofing is one area where cheapest-now reliably becomes expensive-later.
- Ask for a flood test on bathroom jobs, and be present for it.
A vetted marketplace helps here because the accountability is built in.
15. Warranty: What's Really Covered
A warranty is only as good as its wording. Ask:
- How many years? (Match it to the method — a 15-year membrane should carry a meaningful guarantee.)
- What does it cover — labour and material, or material only?
- Who honours it — the contractor or the product brand?
- What voids it — often, later structural changes or poor maintenance.
Get it on paper before work starts. A verbal "don't worry, it's guaranteed" is worth nothing when the ceiling stains reappear.
16. DIY vs Professional
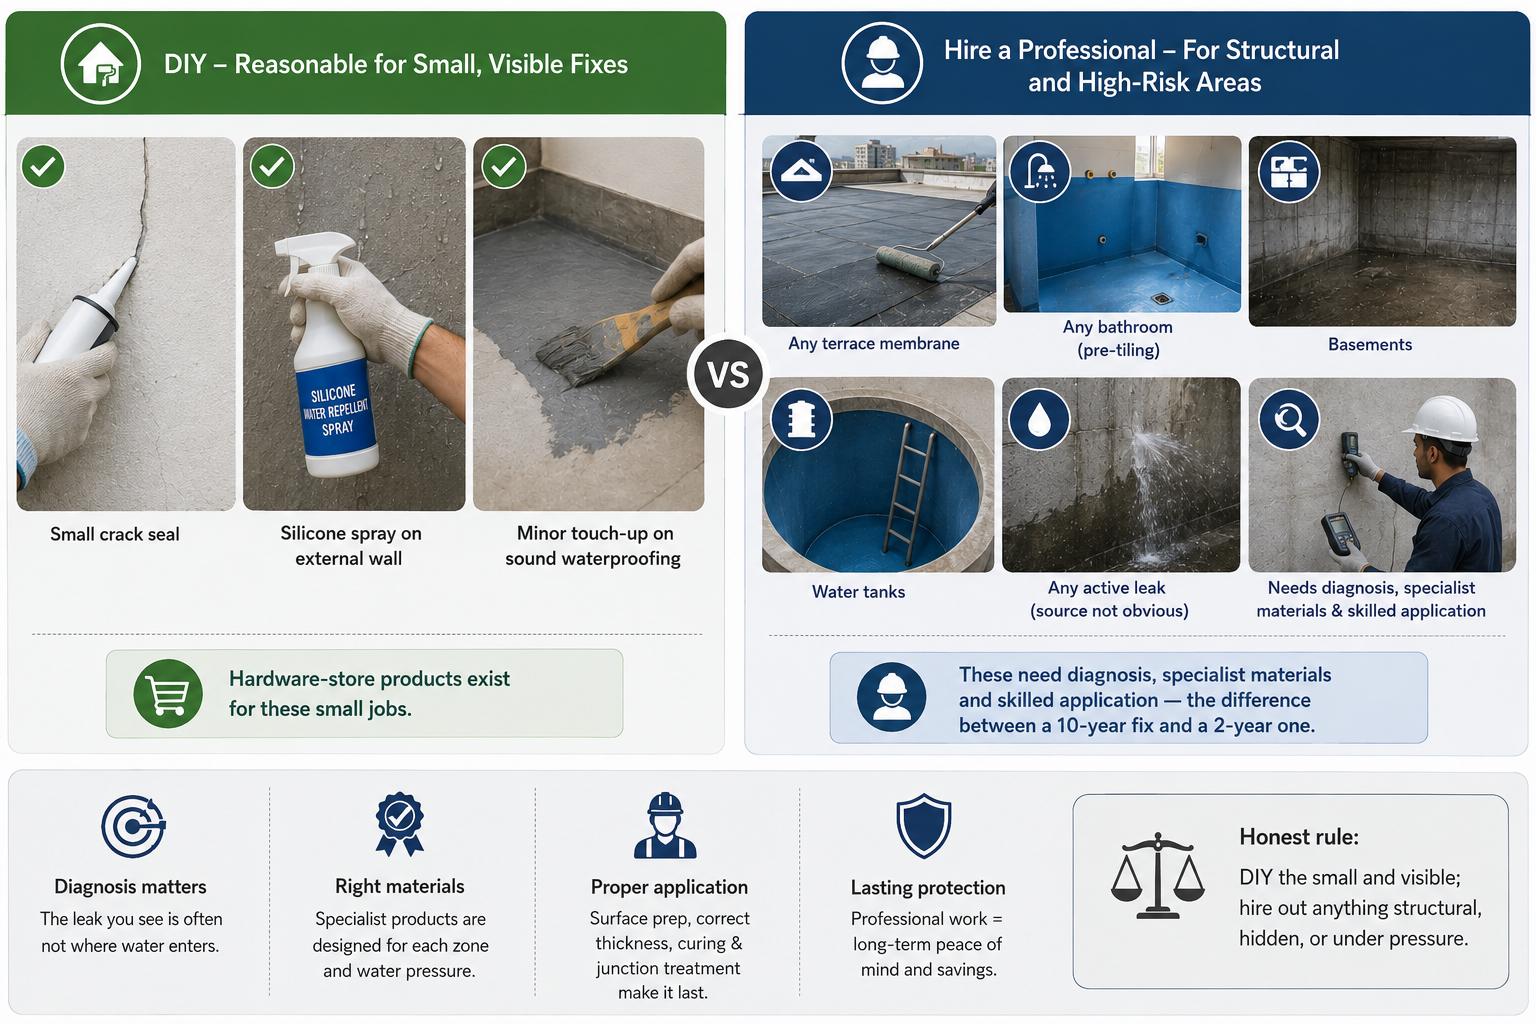
Reasonable DIY: a small crack seal, a silicone spray on an accessible external wall, minor touch-up on sound waterproofing. Hardware-store products exist for these.
Hire a professional for: any terrace membrane, any bathroom (pre-tiling), basements, water tanks, and any active leak where the source isn't obvious. These need diagnosis, specialist materials and skilled application — the exact things that separate a ten-year fix from a two-year one. Diagnosis alone is often beyond DIY: the leak you see is frequently not where the water enters.
Honest rule: DIY the small and visible; hire out anything structural, hidden, or under pressure.
17. Getting It Done Through HomeTriangle
Waterproofing is high-stakes and easy to get wrong, which makes who you hire matter more than in almost any other home job. HomeTriangle connects you with verified professionals who inspect before they quote, name the method and warranty upfront, and carry genuine customer reviews — the accountability that protects you from paying twice.
Because leaks rarely travel alone, pair the fix with the right follow-ups: plumbing if a pipe is the source, and house painting only after the wall is treated and dry. Planning a renovation? Loop in interior design so waterproofing is sequenced before finishes, not after.
KEY TAKEAWAYS
- Waterproofing costs ₹40–₹500/sq ft in 2026 — method and surface decide where you land.
- Waterproof during construction (1–2% of budget); retrofitting costs 10–15× more.
- Each zone needs its own method — terrace membrane ≠ bathroom coating.
- ~80% of leaks start at junctions — corners, parapets, pipe entries.
- Most failures come from poor prep, skipped primer, wrong product, thin coats — not bad materials.
- Paint is not waterproofing — never paint over damp; fix the source first.
- Waterproof before the monsoon, on dry surfaces.
- Choose on method + warranty + accountability, not the cheapest quote.
MYTH vs FACT
| Myth | Fact |
|---|---|
| "A coat of good paint will stop the damp." | Paint traps moisture and peels. Waterproofing addresses the source; they're different jobs. |
| "One product works everywhere." | Terrace, bathroom, wall and basement each need a different method and product. |
| "Waterproofing is done once and forever." | Coatings degrade; most need touch-up or renewal on a schedule (5–15 years by method). |
| "The cheapest quote saves money." | It usually means cheap material and untrained labour — and a repeat job in 2–3 years. |
| "Waterproofing can wait till the leak shows." | Retrofitting after a leak costs 10–15× the cost of doing it during construction. |
| "The leak is where the stain is." | Water travels; the entry point is often metres from the visible damp. |
COMMON MISTAKES
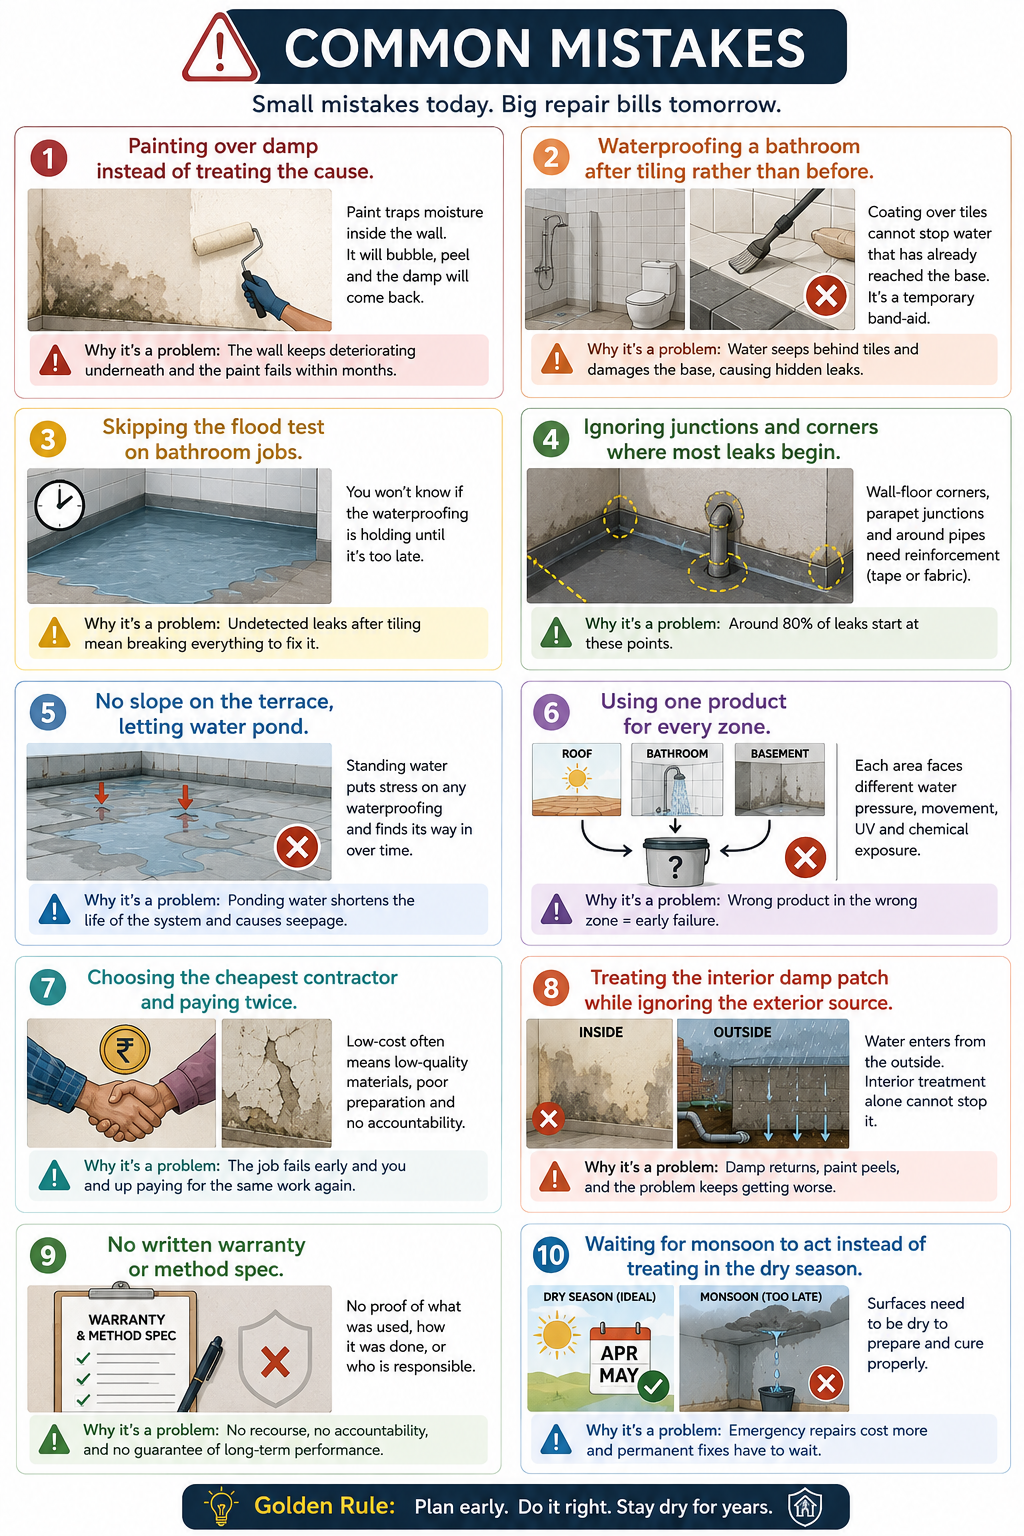
- Painting over damp instead of treating the cause.
- Waterproofing a bathroom after tiling rather than before.
- Skipping the flood test on bathroom jobs.
- Ignoring junctions and corners where most leaks begin.
- No slope on the terrace, letting water pond.
- Using one product for every zone.
- Choosing the cheapest contractor and paying twice.
- Treating the interior damp patch while ignoring the exterior source.
- No written warranty or method spec.
- Waiting for monsoon to act instead of treating in the dry season.
EXPERT TIPS
- Demand a site inspection before any quote — a real diagnosis, not a phone estimate.
- Match the method to the zone and the warranty to the method.
- Ask exactly how junctions and slope will be handled — the answer tells you if they know the trade.
- Insist on a flood test for wet areas, and watch it.
- Fix the source, then paint — never the other way round.
- Keep the terrace drains clear every monsoon; ponding kills coatings.
- Photograph the work in progress — prep, primer, coats — as proof for any warranty claim.
- Budget waterproofing into new construction — it's the cheapest line item that prevents the most expensive repairs.
PRE-WATERPROOFING CHECKLIST
- [ ] Identified all damp/leak signs (patches, stains, peeling, smell)
- [ ] Got a professional site inspection and source diagnosis
- [ ] Confirmed the right method for each affected zone
- [ ] Got quotes with named product, coats, coverage and junction treatment
- [ ] Compared quotes on method + warranty, not just price
- [ ] Confirmed slope/drainage plan (terrace) or flood test (bathroom)
- [ ] Warranty in writing — years, coverage, who honours it
- [ ] Scheduled for a dry-weather window
- [ ] Planned painting/finishing after treatment, not before
- [ ] Kept photos of prep and coats for records

Comments ()